使用vscode来写hugo博客并处理图片插入问题
如果对 typora 情有独钟的同学可以参考https://zahui.fan/posts/b4cf69c3/,不过我用来用去还是发现 vscode 好,哪怕不写代码,仅仅写文章也挺不错的。不过直接用的话有很多问题,我们还需要借助 vscode 强大的插件系统。
插入到 static 目录
插入图片问题
我们在写博客的时候,有时会有一些插入图片的需求,之前的做法是 – 截图保存到 static/images 目录,然后文章里面添加 ,操作很繁琐,或者也可以使用图床,不过也挺麻烦的。我们可以用一款叫 paste image 的插件来简化我们的插入图片的操作。
假设你的博客图片放在仓库根目录的 static/images 目录下,博客文章在其他地方,需要修改
图片存放的位置:
图片的基础路径:
即在 markdown 文件里面不显示 static 了,只从 images 开始显示
路径的前缀:
如果不加的话,路径是类似于
,我们想要的是
以上修改完成后,就可以使用 ctrl+alt+v 键直接从电脑剪贴板粘贴了。
以上配置文件的修改也可以通过直接编辑 json 文件来进行
1 | { |
避免 blog 仓库过大
blog 仓库只保留文本文件,每次提交 commit 也是有意义的,但是像图片等就没必要这样了,所以 static 目录我是用了一个 git submodule,当然还有一种方法是使用图床,放在 github 仓库里,使用 jsdeliver 进行 CDN 加速
使用图床
图床说白了就是个存图片的地方,可以通过 http 直链来访问,可以简化 md 编写和移动,可以使用 PicGo 来简化操作
我用的是 github 做图床,通过 jsdelivr 来进行 CDN 加速,我的配置文件如下(其中 token 需要在 github 后台生成):
1 | { |
按下快捷键 ctrl + shift + p 会自动上传剪切板上的图片,然后将连接写入剪切板
hugo 命令
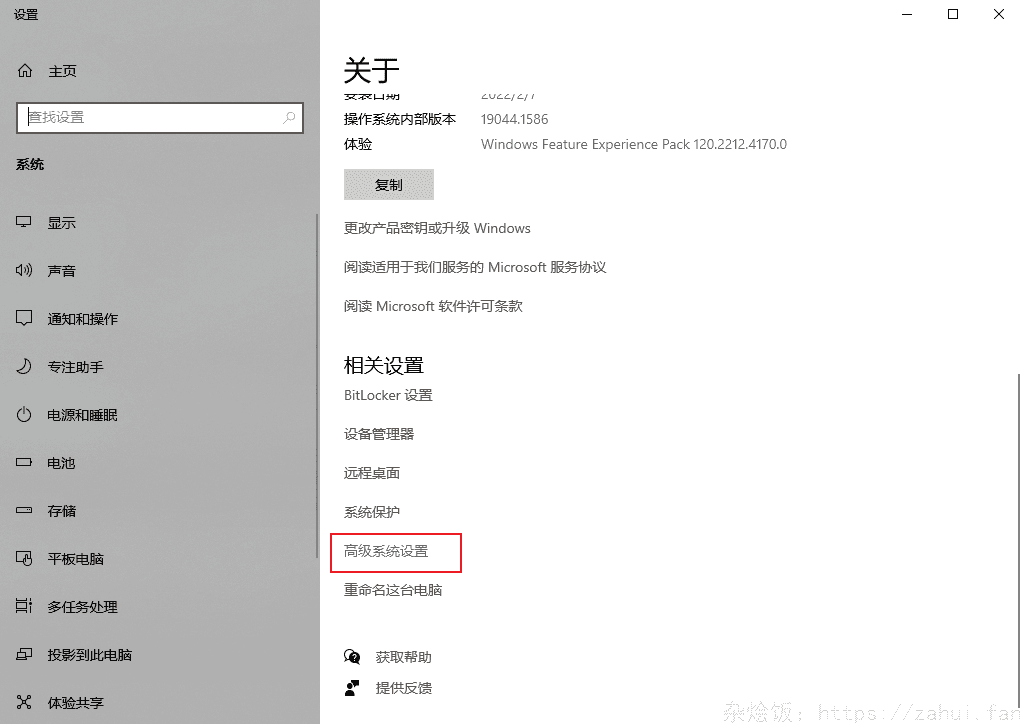
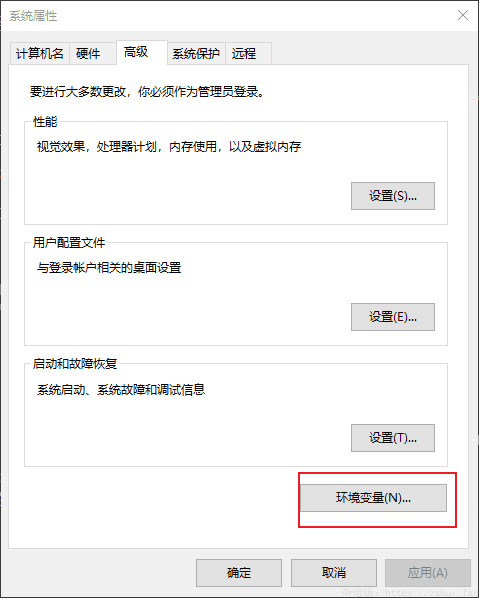
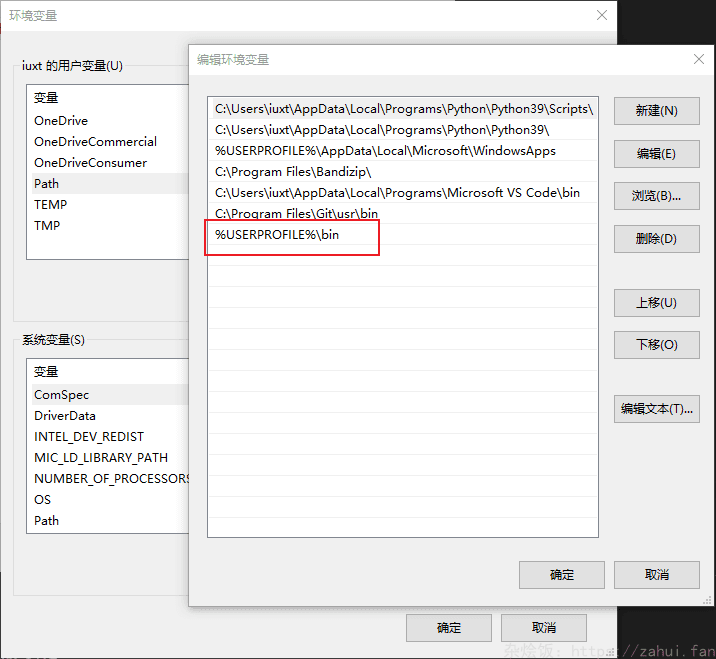
只需要将 hugo.exe 扔到 path 里就好了,我个人比较喜欢的做法是在家目录创建一个 bin 目录,然后把这个 bin 目录添加到 path 环境变量中,具体操作如下:
下载 hugo.exe 放到 %userprofile%\bin 中,然后
系统设置
高级系统设置
环境变量


