公司目前用的 WIFI 是 unifi 的 AP,员工离职后仍然可以连接公司 WIFI,是一个安全隐患,所以准备将 AP 接入 radius 来认证,数据取自 openldap,员工离职删除 openldap 账号即可。

本次操作系统使用的是 CentOS 7

OpenLDAP

参考文章:https://www.server-world.info/en/note?os=CentOS_7&p=openldap

安装 OpenLDAP

1
2
3
4
yum install -y openldap openldap-clients openldap-servers
cp /usr/share/openldap-servers/DB_CONFIG.example /var/lib/ldap/DB_CONFIG
chown ldap. /var/lib/ldap/DB_CONFIG
systemctl enable --now slapd

OpenLDAP 基础配置

  1. 生成一个密码
    slappasswd
    将生成的密码复制保存

  2. 设置 root 密码

    chrootpw.ldif

    1
    2
    3
    4
    dn: olcDatabase={0}config,cn=config
    changetype: modify
    add: olcRootPW
    olcRootPW: {SSHA}nLyOWsRyvfvC6zRBL7M2ltlutgrIgnHH
    1
    ldapadd -Y EXTERNAL -H ldapi:/// -f chrootpw.ldif
  3. 导入基本结构

    1
    2
    3
    ldapadd -Y EXTERNAL -H ldapi:/// -f /etc/openldap/schema/cosine.ldif
    ldapadd -Y EXTERNAL -H ldapi:/// -f /etc/openldap/schema/nis.ldif
    ldapadd -Y EXTERNAL -H ldapi:/// -f /etc/openldap/schema/inetorgperson.ldif

设置目录管理员密码

chdomain.ldif

1
2
3
4
5
6
7
8
9
10
11
12
13
14
15
16
17
18
19
20
21
22
23
24
25
26
27
28
dn: olcDatabase={1}monitor,cn=config
changetype: modify
replace: olcAccess
olcAccess: {0}to * by dn.base="gidNumber=0+uidNumber=0,cn=peercred,cn=external,cn=auth"
read by dn.base="cn=Manager,dc=i,dc=com" read by * none

dn: olcDatabase={2}hdb,cn=config
changetype: modify
replace: olcSuffix
olcSuffix: dc=i,dc=com

dn: olcDatabase={2}hdb,cn=config
changetype: modify
replace: olcRootDN
olcRootDN: cn=Manager,dc=i,dc=com

dn: olcDatabase={2}hdb,cn=config
changetype: modify
add: olcRootPW
olcRootPW: {SSHA}nLyOWsRyvfvC6zRBL7M2ltlutgrIgnHH

dn: olcDatabase={2}hdb,cn=config
changetype: modify
add: olcAccess
olcAccess: {0}to attrs=userPassword,shadowLastChange by
dn="cn=Manager,dc=i,dc=com" write by anonymous auth by self write by * none
olcAccess: {1}to dn.base="" by * read
olcAccess: {2}to * by dn="cn=Manager,dc=i,dc=com" write by * read
1
ldapmodify -Y EXTERNAL -H ldapi:/// -f chdomain.ldif

OpenLDAP 创建用户

basedomain.ldif

1
2
3
4
5
6
7
8
9
10
11
12
13
14
15
16
17
18
19
dn: dc=i,dc=com
objectClass: top
objectClass: dcObject
objectclass: organization
o: Server World
dc: i

dn: cn=Manager,dc=i,dc=com
objectClass: organizationalRole
cn: Manager
description: Directory Manager

dn: ou=People,dc=ch,dc=com
objectClass: organizationalUnit
ou: People

dn: ou=Group,dc=i,dc=com
objectClass: organizationalUnit
ou: Group
1
spawn ldapadd -x -D cn=Manager,dc=i,dc=com -W -f basedomain.ldif

add_user.ldif

1
2
3
4
5
6
7
8
9
10
11
12
dn: uid=zhangsan,ou=People,dc=i,dc=com
ou: People
uid: zhangsan
cn: zhangsan
sn: zhangsan
givenName: zhangsan
displayName: zhangsan
mail: zhangsan@i.net
objectClass: person
objectClass: organizationalPerson
objectClass: inetOrgPerson
userpassword: 123456
1
spawn ldapadd -x -D cn=Manager,dc=i,dc=com -W -f add_user.ldif

防火墙放开端口

FreeRadius

安装 FreeRadius

1
yum install -y freeradius freeradius-utils freeradius-ldap

配置 FreeRadius

配置客户端连接信息

客户端连接信息:/etc/raddb/clients.conf,客户端使用这个 secret 来连接 radius

1
2
3
4
client private-network-1 {
ipaddr = 192.168.2.0/23
secret = 12345678
}

配置 LDAP 连接信息

ldap 连接信息在 /etc/raddb/mods-available/ldap

1
2
/etc/raddb/mods-enabled
ln -s ../mods-available/ldap .

编辑 /etc/raddb/mods-enabled/ldap

1
2
3
4
5
6
7
8
ldap {
...
server = 'localhost'
identity = 'cn=Manager,dc=i,dc=com'
password = 123456
base_dn = 'dc=i,dc=com'
...
}

启动 FreeRadius

调试模式启动

1
radiusd -X

正常启动

1
systemctl enable --now radiusd

unifi

需要先下载 ac控制器,取得管理后台权限。

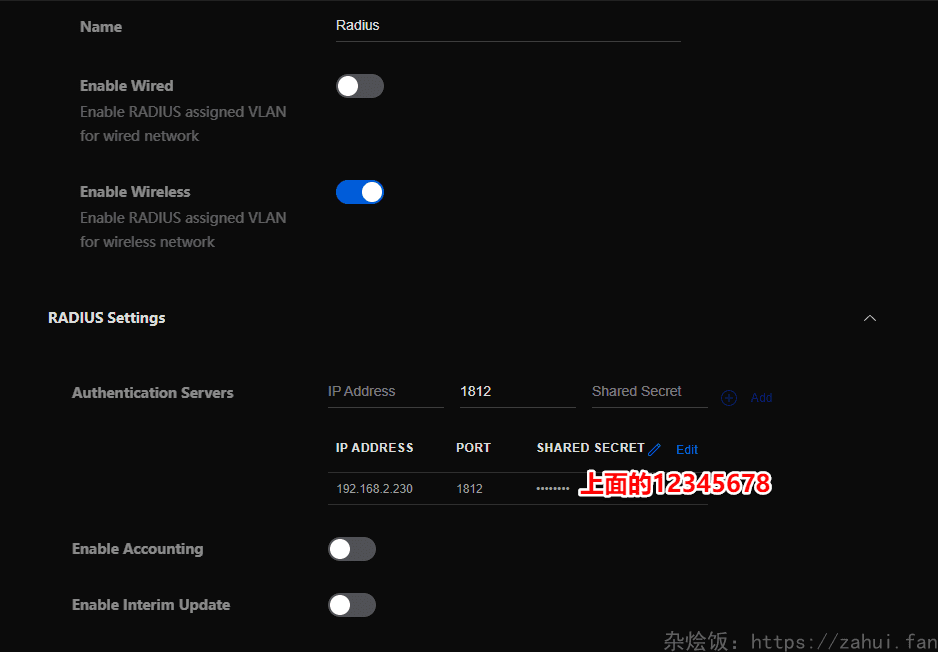
在 Settings – Advanced Features – Radius – Add Radius Profile

打开 enable Wireless 选项

secret 位置填写上面的 /etc/raddb/clients.conf 对应的 secret

AC config